Saturday, June 30, 2012

Kate Spade Nails.

 Today's nails were inspired by Kate Spade and my new phone case!


Here is my cute new phone case that is responsible for sparking my interest in doing this design. 


And here is a bit of the inspiration behind each of the nails...


Getting back to the manicure, the polishes I used were Milani White on the Spot, Wet n Wild Black Creme, Sally Hansen Gold Chrome, and Zoya Jules. For the perfect green shade I used acrylic paint.


Wednesday, June 27, 2012

Glittery Bow Nails.

I've been thinking about a bow manicure for a while now, and I decided that the best way to make it really fun was to add lots of glitter! So for this design I painted all of my nails with China Glaze Some Like it Haute. Then I freehanded the bow with acrylic paint. I wanted a bit more glitter still so I sponged a little Urban Outfitters Dust onto the tips of my non-accent nails. 


In this photo you can really see how pretty the holographic glitters in Some Like it Haute are!


Taupe and Neon Nails.

I really liked the idea of a neutral manicure with a pop of neon, which is how I decided on todays design. For my neutral I chose OPI You Don't Know Jacques and for the neon I went with China Glaze Shocking Pink. I created the perfect lines with striping tape!


Monday, June 25, 2012

Video Tutorial Question.

I'm planning on filming more video tutorials for my youtube channel, and I was wondering which of the designs I've done you would be interested in seeing a tutorial for? Let me know!

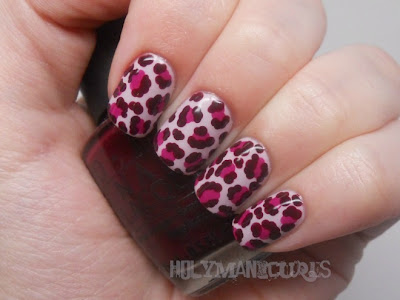
Plum Leopard Nails.

Today's manicure is my first attempt at freehand leopard print nails! I've only ever used a stamp for leopard print in the past, but doing it freehand ended up being quite simple to get the hang of. 


The polishes I used are OPI Steady as She Rose, Ate Berries in the Canaries, and We'll Always Have Paris.

I'll definitely be thinking of other manicures I could use freehanded leopard print for!

Sunday, June 24, 2012

Born Pretty Cuticle Oil Review.

The last item I was sent to review by Born Pretty Store is a cuticle oil. This is the orange nutritional cuticle oil. 


I chose the orange scent because I love citrus scents, but Born Pretty has lots of other scent options. Don't worry about the scent though, it's a very light scent that I don't think you would notice if you weren't looking for it.  

I applied cuticle oil pretty often even before I received this product, but I find myself applying this one even more because of its great packaging. This is so convenient, I've seen lipgloss with this kind of packaging, but never a nail care item. The packaging makes it perfect to throw in your purse and use on the go, something I would never do with my other cuticle oil because I would be worried about it leaking. 

Other than the packaging, I also really like that this oil absorbs into my skin very quickly. I usually will put a bit of cuticle oil on before I take my nail photos to make everything look extra nice, and then I have to wait for the cuticle oil to be absorbed into my skin so that it doesn't look too shiny. Being able to cut down on that waiting time is great!

The cuticle oil is $1.79, the perfect price for a bit of convenient nail care. And of course I have my 10% off coupon code for you!


Saturday, June 23, 2012

Sandcastle Nails.

Today's manicure is another one that's perfect for summer! I don't have too much else to say about it, I went for a pretty simple silhouette and decided to make each of my nails the same. 

The base color is Revlon Blue Lagoon, the sand castes are a mix of Petites Shimmering Sand, Wet n Wild French White Creme, and Zoya Jules, and the flags are OPI My Chihuahua Bites.


And this post just didn't seem complete without a few songs about sandcastles, so here are two that fit the theme.


Friday, June 22, 2012

Born Pretty Steel Ball Wheel Review.

When I was offered to pick a few things to review from Born Pretty Store, I knew that I wanted to test out the steel balls or bullion beads. When I saw this wheel with 12 colors I knew it was perfect!


I've seen a lot of nail art using these steel balls lately for fun studded manicures, but I had yet to see them in person. They were even smaller than I expected when I got them in the mail, which means they don't stick out too far on your nails. The colors in the wheel I received are not exact to the ones pictured on the site. I didn't feel like I was missing out on any important colors though, in fact I didn't notice until I was reexamining the photos for this review! My wheel has pastel green, orange, pastel pink, pastel purple, red, teal, silver, black, gold, iridescent clear, dark green, and a different pale pink.

The steel balls provide a lot of different manicure options. (They're perfect for a caviar manicure if you've been looking to get in on that trend!) I knew I was looking to create a studded manicure.


I used the teal steel balls to create random X's on my nails. Applying them to my nails was really simple and didn't require a learning curve, although it does take a pit of patience and time. I wanted the studs to really stand out so I painted my nails with Wet n Wild Black Creme for the base color. To put the balls on I used Sally Hansen Clearly Quick and an orange stick and once I was finished I secured them with a thin topcoat.

And a thin topcoat seems to be all you need to keep things in place, I've been running my fingers over my new studded nails and admiring the texture quite a bit, and nothing has budged.

I already have lots of plans to use these in the future, they will definitely be a fun addiction to my nail art supplies collection!

If they're missing from your collection, this wheel is $3.33. And as always you can use my 10% off coupon code.

Thursday, June 21, 2012

French and Half Moon Nails.

I really like this combination of both a half moon and a french manicure. Especially in these bright colors, I used American Apparel Neon Yellow and Sally Hansen Brisk Blue. At first I was thinking I'd but a design on the center part of the nail, but after looking at things midway through, I realized I liked the simplicity too much to mess with things.


Wednesday, June 20, 2012

Born Pretty Brush Set Review.

I posted a few reviews for items from Born Pretty Store at the start of the month, and I have a few more items I'll be reviewing over the next few days.


Today I have a review for a brush set offered by Born Pretty. This one has fifteen pieces, including: fan brushes, striper brushes, detail brushes, angled brushes, a dotting tool, and more. 


In order to be able to give these brushes a thorough review, I've been testing them out and putting them to good use for my last few manicures. 

I've already found a few new favorite brushes, the smaller angled brush is perfect for cleanup and the thinner striper brush actually made me feel like I wasn't too horrid at doing straight lines (see my middle finger in today's manicure for proof.) 

I wanted to do a manicure to go along with this review, and after a bit of consideration I figured the best option was a skittle manicure, so I could use a bunch of brushes for one design! I put the dotting tool, both fan brushes, and both striper brushes to use for these nails. The polishes I used are OPI Lucky Lucky Lavender, Mermaid Tears, and Steady as She Rose, and Sally Hansen Silver Sweep.

This was a great way to play around with the brushes, and I really liked how fun this manicure turned out to be. I might even have to do a full plaid manicure in the near future. 


All in all I think this is a really great brush set. It has every type of brush (and more) that I would need for any of the manicures I do. For all fifteen brushes it's only $4.74, which is a great price. Before getting this set I mostly used paint brushes that I cut down for nail art, and for fifteen of them it would add up to a lot more than $4.74. This would be a perfect starter kit if you don't have many nail art brushes yet, or if you aren't happy with the ones you do have.

And once again I have my 10% off Born Pretty coupon for you to use!

Tuesday, June 19, 2012

Mermaid Tail Nails.

I started my attempt at mermaid nails yesterday but wasn't liking how things were going, so I decided to put it on hold. After looking at my half-finished manicure some more, I decided that I didn't want to just scrap things completely because I really liked the soft teal gradient (it ended up photographing a bit more blue, but the tealness is very evident in person.) So I stuck with that and decided to go in a different direction.


The design I stamped with is from the BM-209 plate, and I stamped with Sally Hansen Silver Sweep.

For the gradient I used OPI Mermaid Tears and China Glaze Shower Together, with Sinful Colors Hottie over top. And here is a picture of the gradient on it's own just because.


Sunday, June 17, 2012

Funky Swirl Nails.

This is one of my favorite manicures, it hits on my favorite points, (bright and fun) perfectly. I used a white polish as my base (Sally Hansen Whirlwind White) but the entire design was done using acrylic paint. 


I'm already thinking of more fun color combinations I could try this in!

Saturday, June 16, 2012

Striped Flamingo Nails.

Someone on Instagram (my username is holymanicures on Instagram if you want to check it out) requested a flamingo manicure, so I decided to see what I could come up with! When I started working on the design I didn't think I liked where it was going, but by the time I was finished I was very happy with it. I do think it comes across a bit better in person though. 


The blue base color is Revlon Blue Lagoon, the pinks I used are CND Raspberry Plunge, Wet n Wild Tickled Pink, and Revlon Twinkled Pink. The white I used is Sally Hansen Whirlwind White and the black is Wet n Wild Black Creme.

Thursday, June 14, 2012

Boysenberry Paisley Nails.

When I decided I wanted to do paisley nails, I immediately knew what would make for the perfect inspiration.


I used the Vera Bradley sticky note set in Boysenberry. I've been looking at it a lot lately since I've been using the long list sticky notes to jot down manicure ideas, and it was hard not to be inspired.


I really liked the color combination in my inspiration so I tried to stay true to that. The base color is OPI Ate Berries in the Canaries and the other polishes I used are Essence Just Rock It!, China Glaze Secret Peri-winkle, Sephora Myrtille, and Wet n Wild French White Creme.


Tuesday, June 12, 2012

Scalloped Half Moon Nails.

Today's nails were inspired by a picture I saw on tumblr and traced back to this tutorial.

The colors I used for this design are Revlon Blue Lagoon, Revlon Plum Seduction, OPI Ogre the Top Blue, and Milani Dressmaker. I really liked the color combination, maybe it will show up in another design in the future!


In other news, I'm going to work on more video tutorials soon, so let me know if there are any specific designs I've done you'd be interested in seeing a tutorial for.

Monday, June 11, 2012

Cow Nails.

I love doing different animal themed manicures, and cow nails have been on my to-do list for a while now. 

At first I thought I'd freehand the cow face but do the spots with a stamping plate, but I eventually decided to just freehand everything and I'm happy with how that worked out. 


I used my current go to black and white polishes for this design, Wet n Wild Black Creme and French White Creme. The pink polish is from Urban Outfitters and doesn't have a name on the bottle. 

Saturday, June 9, 2012

Sunflower Nails.

After a few of my nails breaking too badly for Orly Nail Rescue to be the solution, I had to cut my nails down a bit shorter than I would have liked. If I had my choice, my ideal nail length would be right around here. Luckily my short nails are still plenty long enough to have fun with nail art. 

I think this sunflower design is great for summer, and it's one flower type I hadn't tried before. When I was thinking about my inspiration this was my favorite sunflower design I'd seen before and the one I decided to be most inspired by.


The greens I used are China Glaze Tree Hugger and Wet n Wild Sagreena the Teenage Witch. I used two different glitters, one over the base and one in the centers of the flowers. Those are Color Club Starry Temptress, and LA Girl Clear/Gold. The colors for the sunflowers are CND Bicycle Yellow and OPI Chop-sticking to my Story.