Showing posts with label Wet n Wild. Show all posts

Thursday, July 10, 2014

Subtle Circle Nails.

I realized it's been a while since I've done any subtle stamping, and thought I'd give it a shot. I broke out a stamp I don't think I've used before, the target-like circles from BM-19. 


I used a coat of Wet n Wild Gray's Anatomy over CND Asphalt as my base color and stamped in Color Club Foil Me Once.


The effect is a little more subtle in person, which I really like and I was happy to get to break out Gray's Anatomy which was a favorite 4-ish years ago.

Thursday, June 12, 2014

Born Pretty Plate W-02 Review.

Today I have a review of another Born Pretty Store product, one of their plates. This one is basically the ultimate girly stamping plate. 


The W-02 plate has lots of bows, hearts, and even a moon. You can find this plate for $1.54 from BPS.
W-02 happens to have a lot of the same/similar images to another plate from Born Pretty that I own, m59. I didn't want to use an image I've done before, so for today's manicure I chose to use the image in the center of the plate. 

Since the image was very girly I decided I wanted to pair it with a girly glitter I've been waiting for the perfect opportunity to use, Nails Inc. Fulham Palace Gardens. 


The blue polish I used for this manicure is Wet n Wild Saved By The Blue, and I stamped with the Konad Special White polish.

I added some of the glitter to the nails with the stamped design to tie everything together, which I think worked out nicely. This feels like a perfect, feminine manicure for summer.


As always, if you're interested in getting this plate or anything else from Born Pretty, you can enjoy 10% off with the coupon code BRJ61.


Sunday, June 8, 2014

Tiny Pineapple Nails.

It's been a while since my last post, but now that I have survived finals and moving into my first apartment, I want to get back to blogging regularly. 

My nails have certainly suffered during the rigors of moving and building Ikea furniture, but my cuticles are starting to recover, and hopefully my nails will only be painfully short for a little while longer. 

For today's manicure I decided to do something in accordance with one of this summer's biggest fashion trends, pineapples. 


The base color for the design is Wet n Wild French White Creme, and the pineapples were done with acrylic paints.


I think these are perfect for summer, and it's one design that I think looks just as good on short or long nails!

Sunday, January 12, 2014

Argyle Nails.

An argyle design is something I've wanted to do for a long time but had never even attempted until now. I'm not sure why it took me so long because I think it makes for a cute manicure!


The polishes I used were Nails Inc. South Kensington, Nails Inc. Baker Street, OPI Don't Mess With OPI, and Wet n Wild Black Creme.

Saturday, January 11, 2014

Moon Phase Nails.

Moon phase designs have been very popular in fashion lately, and I thought they might translate nicely to nail art. So, of course I had to try it! 


The polishes I used for this design were OPI Lucernetainly Look Marvelous, OPI I Don't Give A Rotterdam!, Wet n Wild French White Creme, and Sephora Formula X Dark Matter.


During the manicure process I wasn't sure if I'd end up caring for this manicure but I'm actually very happy with how it turned out. This manicure is a fun way to reinvent your use of half moons and ruffian designs. Plus, it was easy enough to do, I used reinforcements to help with my moon shapes and a sponge and small brush for adding details.

Thursday, January 9, 2014

Golden V-Gap Nails.

Gold and black is my perfect manicure color combination because it coordinates perfectly with all my outfits and jewelry. 

I especially like the simplicity of this design and the pop of gold glitter at the base of the nails! 


The polishes I used were Wet n Wild Black Creme and Sephora Formula X Bond, Ionic Bond (my new favorite glitter!)

Monday, January 6, 2014

Distressed Book Nails.

I've dedicated my free time over winter break (the time that hasn't already been reserved for nail art) to doing lots of reading. And so I wanted a manicure that would remind me of books and reading in general. 


I used rubbing alcohol to transfer the text and highlights from a magazine article to a base of Wet n Wild French White Creme. I went for a messy, distressed look so you can't actually read the any words but still get the idea.


When I was making my list of favorite manicures of 2013, I decided I also had to compile a list of my favorite books and thought now would be a good time to share a few of my top picks from the year. The books I'm recommending to everyone are:
  • Sharp Objects by Gillian Flynn 
  • Drowning Instinct by Ilsa J. Bick
  • The Husband's Secret by Liane Moriarty
  • The Bronze Horseman by Paullina Simons
Doing this manicure also reminded me that in 2012 I enjoyed doing manicures that were inspired of specific books and there was none of that in 2013. Hopefully I'll read something that inspires a little nail art soon and be able to get back into that. 

Sunday, January 5, 2014

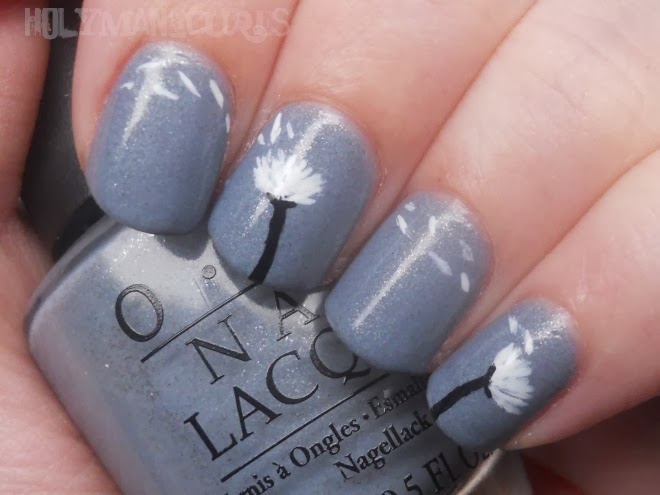
Dandelion Nails.

Way back before I started blogging about nail art I was inspired by this manicure to do dandelion nails. And when I was looking through some old photos I thought it would be a fun design to revisit and be able to share here! 


The base color I decided on was OPI I Don't Give A Rotterdam! and the other polishes are Sephora Formula X Dark Matter and Wet n Wild French White Creme.

Wednesday, January 1, 2014

Streaky Distressed Nails.

I've had this tutorial saved to watch for a while now, and when I finally did and saw how simple the technique was, I had to give it a shot!


This technique gives you a look similar to a shatter or crackle polish but you have more control, the results are super smooth and you can easily layer lots of colors.


In the tutorial neon polishes are used but I chose a few shades I thought were more suited to cold weather. The polishes I used were China Glaze Shower Together, Julep Taylor, Wet n Wild French White Creme, Wet n Wild Black Creme, and a Julep polish (the pinkish-red color) that I don't have on hand for the name!


I think this would be the perfect design for a little last minute nail art, especially because it's super easy to do on both hands! In the future maybe I'd want to try this technique with more color combinations and different polish finishes.

Tuesday, December 10, 2013

Born Pretty Star Stickers Review.

I have another Born Pretty Store review for you today! The product I have to talk about are glitter star stickers. I have them in six colors; silver, white, hot pink, black, purple, and pale pink. 

For today's manicure I used two different sizes of stars in the white color. The white has a very pretty iridescent glitter that reminded me of snow. 


The base color I used is Wet n Wild Saved by the Blue (I hadn't broken this color out in forever but I love it!) So far the stars have received very positive reactions and the stars in combination with the blue have elicited comparisons to the 4th of July, Boogie Nights, and Dallas Cowboy cheerleaders.


These work great as an easy way to make any manicure special. They're of course super simple to use, my only tip is to use a thick top coat because they're not completely flat!


Born Pretty also sent me a couple of accessories; a bow ring and a pink lipstick pen which I've been getting a lot of use out of lately.

It's easy to forget that Born Pretty has non-nail related things since they have so many great nail art products. But they have plenty of cute things that aren't related to nails, these are just two examples!


If you want to order one of these items or anything else from BPS you can get 10% off with the coupon code below!

Monday, December 9, 2013

Winter Stone Nails.

It's finals week (or weeks as it happens to be at my school) and one of my final projects was all about nail art. Part of the project involved a how-to section, and the design I thought would be easy and fun to teach was water spotting. Instead of teaching off a water spotted manicure I've done on the past I decided to do a new one using nice icy winter colors.


The polishes I used were Wet n Wild French White Creme, CND Asphalt, and Color Club Lumin-icecent. The white was my base color and then I water spotted with the CND and Color Club polishes over top.


The project also involved doing nail art on a few other people. Here are the manicures I did for them that I instagrammed earlier in the week. I especially liked the one on top, I'll have to break out my striping tape again soon!


In other news, I can't promise too many more posts during the rest of December because of finals and holiday busyness. However, I've decided that since last year I enjoyed my attempt to post everyday in December, I'll do the same thing for January. So, come January 2014 I'm planning to post nail art everyday. Feel free to let me know if there are any manicures in particular you would like to see during that time! 

Monday, October 28, 2013

Born Pretty Neon Square Studs Review.

During the time I've been blogging here, I've reviewed a lot of things from Born Pretty Store, many times those things being studs. 

At this point there is only so much to be said, but they keep coming out with new studs that I want to share with you! 


Most recently, I've received a wheel of their fluorescent candy colored square studs. The wheel contains twelve different colors, which basically means endless manicure options! I already have lots of ideas of how to put them to good use, but for today's post I tested out two of the colors.


My first time using the studs I decided to do a kind of creepy, neon drip manicure. I thought it would be fun for Halloween. The polishes I used were China Glaze In The Limelight and Wet n Wild Black Creme. Then I finished off my accent nail with the neon green studs. I stuck them on using my typical method, a little bit of topcoat and a dotting tool.


Since I wanted to give using the studs another shot, the manicure you're actually going to find my sporting for Halloween is the one below.


For this manicure I used the same black polish and just added orange studs to the base of each of my nails. I've really been enjoying the simplicity of this one!

In the future I can't wait to combine lots of different colors and play around with my options. Studs are already so much fun to add to any manicure, and even more so when they're in awesome colors.


If you're interested in getting a wheel of your own they cost $7.59, or you can buy different colors individually for $2.99 a bag. As always you can get 10% off any BPS purchase with my coupon code, BRJ61. 

Saturday, October 26, 2013

Sparkly Bat Nails.

My nails have been breaking a lot lately, which has led to them being quite short. I don't find short nails as fun to work on, but thankfully I do find Halloween to be very inspiring for nail art. Which means I've actually been doing designs more lately. 

For today's manicure I broke out one of the glitter polishes I bought when I loved them. ( I mostly stick with cream finishes now.) In order to update it a bit I decided to stamp bats overtop for Halloween. 


For the base of the manicure I used Icing's Force of Love over a coat of Wet n Wild Black Creme for opacity. Force of Love is supposed to be a dupe of Deborah Lippmann's Across the Universe.

The stamp I used was Bundle Monster BM-213, and the polish I used is Sally Hansen Silversweep.


I was happy with how this design turned out, and I think the bats go great with Force of Love. Sadly I didn't get much use out of the manicure because it turns out Force of Love is just one of those glitters that goes on very thick and refuses to dry!


If you're still trying to decide on nails for Halloween, you still have a few days to think up something awesome! If you want any ideas, you can check out some of the designs I've posted in the past or keep waiting because I have a few other appropriate manicures that I'll be sharing soon!

Friday, June 21, 2013

Glitzy Turquoise Stone Nails.

During my hiatus I saw a lot of water spotted nails and knew I needed to try it, but I wasn't doing much nail art, so I've just recently gotten around to giving it a shot! I knew I wanted to create a turquoise stone design with water spotting and I loved how it turned out. 


I read a few different techniques for water spotting; some people used hand sanitizer, some hairspray, others perfume. When I first attempted it I started with hairspray but didn't have a ton of luck. I ended up switching to using body spray to create the veining for the stones, and from there everything worked out without any issues.


The turquoise color I used was BK Candy 06, the black was Wet n Wild Black Creme, and the gold is Orly Rage.


As I said I was very happy with the results, and I was very pleased to find water spotting is easy to do. I already have plenty of ideas for other manicures using this technique!

Tuesday, December 25, 2012

Christmas Tree Nails.

Today's manicure is probably my favorite out of all the Christmas designs I've done! 


I started with a base of Zoya Jules and then used striping tape and Wet n Wild Sagreena the Teenage Witch to add the tree.


The finishing touches were rhinestones for tree toppers, and a little bit of glitter (Milani Gems) for ornaments.