Tuesday, July 31, 2012

Layered Circle Nails.

For today's manicure I played around with a new technique. I think the results are pretty fun! The base color is Milani White on the Spot and the circles are done in OPI Ogre the Top Blue, China Glaze First Mate, and China Glaze Purple Panic.


In other news I chose the winner for my giveaway today! I emailed the winner and sent the prize, hopefully they'll find lots of stuff they enjoy from BPS. I'm looking forward to doing more giveaways or contests in the future!

Sunday, July 29, 2012

Born Pretty Silver Glitter Review.

I've seen hexagon shaped glitter used in a lot of great manicures (particularly a bunch from The Nailasaurus) and knew I had to try it out for myself! 

Born Pretty sent me their loose hexagon shaped glitter in the silver color to test and review, and it may just be my favorite item I've received from BPS so far! Looking at the glitter from this angle in the container you can't tell just how pretty it is, but as soon as a little light hits it...


 ...it becomes gorgeous!


And here is the glitter in action. One of my favorite ways I've seen this type of glitter used is to create a border around the nails, so that is what I decided to try. The base color I used is China Glaze In the Limelight.


I was a little worried the glitter might be tricky to work with since loose glitters can be such a mess, but it was surprisingly easy. 

I used an orange stick to pick up one piece of glitter at a time, I found it was easiest to pick up the pieces of glitter that were stuck to the lid or stuck on the edges of the container. That way you aren't accidentally picking up a bunch of pieces at once. 

Then I just put a tiny bit of clear polish where I wanted the glitter to be and gently put each piece in place with the orange stick. 


I can't wait to try and use this glitter in different manicures, I'm sure I'll get a lot of use out of it! If you want to try the glitter for yourself, it costs $2.38 (and you get a lot of product in the jar) and it can be purchased here. And once again here is a 10% off coupon code you can use on any Born Pretty purchases!


Lastly, don't forget to enter my giveaway if you haven't already. I'll be choosing the winner tomorrow!

Saturday, July 28, 2012

Shattered Glass Nails.

I'm really happy with how today's manicure turned out! I always like a good gradient and stamping combination. 


I chose three slightly grey-toned colors for the gradient: OPI Steady as she Rose, OPI Mermaid Tears, and American Apparel Factory Grey. The image I stamped with is from BM-208 and the polish I used for stamping is Sally Hansen Silver Sweep. I like how Silver Sweep looks like it has a tiny bit of texture!


Friday, July 27, 2012

Born Pretty Fimo Slice Wheel Review.

When Born Pretty asked me about items I'd be interested in reviewing, I went on my tumblr and asked if anyone had certain types of nail art supplies they'd like to see me incorporate into a manicure. Multiple people suggested fimo slices, so I decided to review this wheel with twelve different fimo slices (and 120 pieces.) 


This wheel is perfect for someone who wants to experiment with fimo slices and hasn't used them before (like me.) The fact that they're pre-sliced makes everything extra simple, and you get a good variety of slices to try out. One of my favorites is a tiny teddy bear. I don't know how I would use it in a manicure just yet, but it's awfully cute. The other slices include an apple, a heart, a smiley face, multi-colored butterflies, and more.

For my very first manicure using fimo slices I chose to use the pink flowers.


The manicure was inspired by Katy Perry's nails in the Wide Awake music video. I used China Glaze Sunset Sail as my base color, and then freehanded fun french tips onto my nails. The purple is OPI Done Out in Deco, and the other colors I mixed to get the right shades.


I didn't have any problems with using the fimo slices, I just placed a little topcoat where I wanted them and then put them on my nail and once they were all placed I added a layer of topcoat over the entire nail.


Besides keeping things nice and simple for a first time fimo user, this wheel is just $1.79. And once again here is my 10% off coupon code for you to use!


Also, don't forget to enter my giveaway if you haven't yet! It ends on Monday.

Wednesday, July 25, 2012

Born Pretty Half Pearls Wheel Review.

I mentioned in my post about my giveaway that I had been sent a few more Born Pretty Store products to review, and the first one I'm going to be talking about is a wheel of multicolored pearls. 


I've slowly been branching out into making my manicures more 3-D from time to time (rhinestones, steel balls, etc.) and I thought pearls were the perfect thing to try out next. I wasn't sure exactly what the best way to use them would be, so I decided to just play around by using the pearls to create a fun accent nail design on top of a very neutral base color (OPI Skull and Glossbones.)


For testing out the pearls for the first time I wanted to make use of some of the great color options, so I used four different ones.

If you've had any experience with using rhinestones for nail art, working with half pearls is very much the same. I dipped a dotting tool in a small amount of topcoat to pick up a pearl and then placed it on my nail while my base color was still drying. The whole process went very smoothly. Some of the pearls were connected on the sides, but they break apart very easily.

I'm already brainstorming more ideas of how I could use the pearls. I definitely want to include them in a floral design sometime!

If you need pearls in your nail art collection, this wheel costs just $3.55. And as always, you can use my 10% off code for any Born Pretty purchases!


Monday, July 23, 2012

Born Pretty Store Giveaway.

Over the past few months I've posted a bunch of reviews for items from BornPrettyStore.com and various manicures I've done with those items. I've found a lot of items I love on their website and I'm happy to help anyone reading find new products to try and love. So of course, when BPS offered to sponsor a giveaway for my followers, I jumped at the chance.

The prize is a $20 gift card that you can use for anything on Born Pretty Store. (And shipping is free so the entire $20 can go towards great products!)

The only rule for entering is that you need to be following this blog on blogger, then all you have to do to enter is leave a comment on this post with your email address! The giveaway will end next Monday, July 30th.

You can start planning what you would get if you win by looking at some of the reviews I've done for BPS items, here. There are a few more Born Pretty items I'll be reviewing over the next week, so you can look out for those too!

Symphony in Hue Nails.

In June I posted this manicure, inspired by a Vera Bradley pattern on my favorite post-it notes. After that post I had a few requests to do manicures for some of the other Vera Bradley patterns. I decided to go for it since I don't care to carry any of my Vera Bradley items anymore, but the patterns are still perfect for being worn on my nails. 

This time I took my inspiration from this ID case in the Symphony in Hue pattern.


And here is the manicure I came up with...


This design was the biggest pain to clean up, the blue polish was especially bad since it stains. I'll have to remember that for next time. The polishes I used were Wet n Wild Black Creme, CND Bicycle Yellow, Sally Hansen Presto Pink, Sally Hansen Brisk Blue, and Sally Hansen Lickety-Split Lime. The rest of the colors are acrylic paints.

Sunday, July 22, 2012

Bubble Gradient Nails.

I love manicures with dots and I love gradients, so what is not to like about a manicure that includes both? The design was inspired by this one. 


The base color is a coat of Sally Hansen Silver Sweep with a coat of Wet n Wild Silvivor on top. The three dot colors are American Apparel Office, Factory Grey, and Mount Royal.

I really liked this manicure, maybe I'll try a neon version next!

Saturday, July 21, 2012

Hello Kitty Nails.

I've been thinking about doing Hello Kitty nails for a while now, but the other day my friend gave me a Hello Kitty friendship bracelet and I was inspired!


This is the bracelet that was the main source of inspiration.


The pink is China Glaze Rich & Famous and the white is Milani White on the Spot. The yellow and black are acrylic paints. The bow is made up of a rhinestone and steel balls.

Friday, July 20, 2012

Starfish Nails.

At the beginning of summer I was going one of my friend's nails and she requested a starfish design, and I decided I liked it enough that I wanted to test it out on my own nails! It's a simple design and great for summer.


The base color is two coats of China Glaze For Audrey with two coats of Essie Turquoise and Caicos on top. The starfish are OPI Hot  & Spicy with OPI Coney Island Cotton Candy for the dots.

Thursday, July 19, 2012

Silver Glitter Gradient.

My trip to New York was very tiring so today I was looking for a manicure that wouldn't be time consuming. I wanted to use a new polish I hadn't had a chance to use yet, so I decided a glitter gradient would be perfect!


I loaded on lots of glitter and it was very reflective so it wasn't the easiest to photograph, but I certainly think you can get the idea. The base color is China Glaze First Mate and the glitter is Urban Outfitters Dust.

Tuesday, July 17, 2012

New York Nails.

When I was leaving New York for the summer I did a city skyline design inspired by NYC, and now that I'm going on a day trip to the city with some friends, I needed a different manicure that said how happy I was to be back. 


The base color is Milani White on the Spot and the lettering and heart are done in acrylic paint.

Monday, July 16, 2012

Neon and Nude Nails.

I bought a few new China Glaze polishes recently, and wanted to incorporate them into a manicure! I started out by painting my nails with China Glaze Purple Panic. It's a great neon, and as soon as it was on my nails I fell in love with it. It will probably be my go-to color for my toes for the rest of summer. 

Once I decided I liked the base color so much I didn't want it to be too concealed by a design, so I thought a simple accent nail was the best choice. I painted my accent nail with China Glaze Sunset Sail, and added a row of rhinestones that happened to be a great match! 


I wish I had gotten to wear this for longer, but I'll definitely be using the purple more.

Saturday, July 14, 2012

Peppermint Swirl Nails.

Today's manicure was done the same way as this one from a few weeks ago but with a different source of inspiration and fun twist!


I went to see Katy Perry's new movie recently (I really enjoyed it) and couldn't help but be inspired by her costumes. They were all great, and of course I loved the candy theme. One of my favorite's was this (spinning) peppermint dress, and that's what I decided to be inspired by!


Although this design would be really cute for Christmas, I think the glitter and the swirl of fuschia help keep it from looking like a winter-specific manicure.

I did this design with acrylic paints, and the glitter is Color Club Starry Temptress.

Friday, July 13, 2012

Cool Chevron Nails.

I always love a fun manicure involving chevron, so that is what I wanted to do today. I opted to use cool-toned acrylic paints for the design, on top of a base of Milani White on the Spot. 


I really liked how this design turned out, even though it wasn't exactly what I was going for when I started the manicure. However, I think this is the sort of manicure that reads better in real life.

Thursday, July 12, 2012

Rainbow Target Nails.

When I started this design all I knew was I wanted something that screamed rainbow!


I think the manicure definitely hit that mark. I started by using a striping brush to make a bunch of stripes in rainbow colors. The polishes I used were OPI Elephantastic Pink, China Glaze Thataway, Orly Spark, China Glaze Treehugger, Revlon Blue Lagoon, and China Glaze Spontaneous.

I wasn't sure what the next strep should be, but I eventually decided that stamping a pattern over top would be fun and add a lot of visual intern. I used Konad Special White polish to stamp and the image is from BM-206.


Wednesday, July 11, 2012

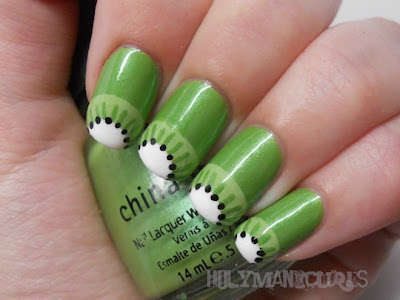
Kiwi Nails.

I attempted kiwi nails last summer, pre-blog and thought they were so cute, so I figured it was time to do them again! 

Not much changed from when I did them the first time, except now I'm using better tools and taking better photos to document the cuteness. 


The base color is China Glaze Treehugger, and the green for the kiwi is Treehugger mixed with a little white polish. The white is Milani White on the Spot and the black is Wet n Wild Black Creme.

Monday, July 9, 2012

Sideways Gradient Tutorial.

I've been wanting to do another youtube tutorial for a while now, and I've finally gotten around to it! One of my posts that a lot of people expressed interest in was the lime sideways gradient I posted around a month ago. I've gotten a lot of questions about gradients in general, as well as that specific manicure, so it seemed like a good choice for a tutorial. Here is the video...


And here is a better look at the finished design...


 I used the same glitter from my last sideways gradient (Color Club Starry Temptress,) but chose different neons for the gradients. The ones I used this time were China Glaze Shocking Pink and Color Club Wink Wink Twinkle. The finishing touch was a magenta rhinestone!


I'm still working on the filming set-up and finding out how to make better videos, but hopefully this was helpful! I had a lot of suggestions for other tutorials people would like to see, so I'll be working on those soon.

Sunday, July 8, 2012

Layered Dot Nails.

Today's manicure is another fun dot design! Placing lots and lots of dots can be a bit time consuming, but this is definitely very simple to do. 


I used three polishes for this design, OPI Ski Teal we Drop, Orly Pixy Stix, and Essie Mint Candy Apple.